I don’t know how many times I’ve said this through the years, but it remains just as true today as it’s ever been. Sometimes I get so dug in on an idea, and while my comment section can often feel like I’m drinking from a fire hydrant with all of the number of ideas being shared with me (which I love, but can also feel a bit overwhelming at times 😀 ), sometimes it’s one single comment that gets my attention and really gets me thinking in a new direction.
And that’s exactly what happened when Phoebe made a suggestion about the closet and laundry area combination room that I’ll be building in the current guest bedroom. She suggested that I divide the room into two separate areas so that I can have a separate closet and a separate laundry area.
That’s an idea I had already considered, but I had ruled it out because in my mind, one room (presumably the laundry room) would be accessible via the current door into the room from the hallway, and the other area (presumably the closet) would require a new door from our soon-to-be bedroom into that sectioned off area. I shared this idea a while back, and it looked like this…

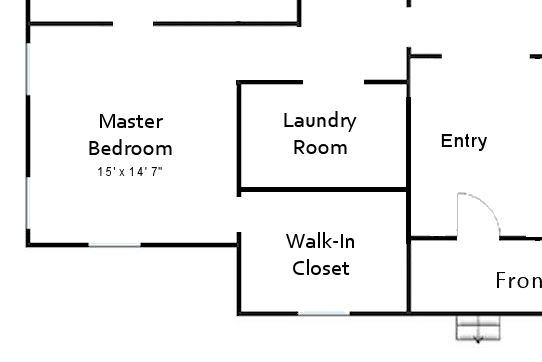
I had considered that option very seriously, and had even talked to Matt about it, but for some reason he’s adamant about not building a wall in that room, and especially about not putting a doorway from the bedroom into that room. I don’t know why he’s so adamant about that, but he is. And since he makes so few requests when it comes to this house, I pay attention when he actually is adamant about something, even if I don’t understand his reasoning. 😀 And since then, I’ve gotten pretty excited about having a comfy little reading area where the door into the closet would need to be, anyway. With that idea in mind, I had moved past the two-room option and have really become attached to the reading area idea, so I don’t want to give that up now.
All that to say that when this idea was presented, I didn’t really consider it. I wrote it off immediately, and explained why I couldn’t and wouldn’t do it. Phoebe explained that’s not what she envisioned, and she sent an email to explain her idea more in detail. She wasn’t suggesting closing the two areas off to each other completely, and she wasn’t suggesting putting a door from the bedroom into the new closet space (which, for some reason, is the part that Matt really objects to). And she sent me this drawing…

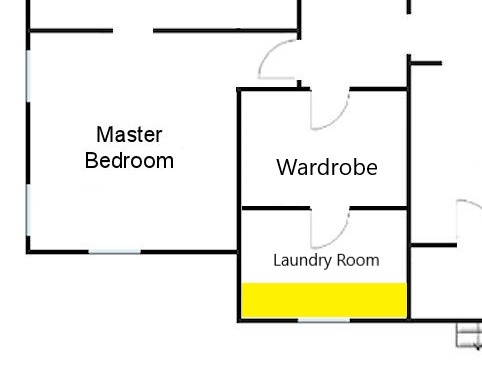
I was intrigued. Her design still showed a wall diving the two areas, and I knew that Matt wasn’t thrilled with that idea. But I thought that maybe since it didn’t require a doorway from the bedroom into the sectioned off part of the room (the part labeled Laundry Room), he might be on board. So I started playing around with the arrangement.
What I realized very quickly is that this plan wouldn’t even require me to build a wall at all. I could literally just use the wardrobes, placed in two “U” arrangements and secured to the floor and ceiling, to section off the room into two spaces.
At first, I was having a really hard time getting everything to fit because I was still set on using the 23-inch-deep IKEA wardrobes for both areas. Wrapping such deep wardrobes around corners causes a whole lot of wasted space, so with four wasted corners, I wasn’t actually gaining any storage space by having more wall space available. Anything I’d gain with more wall space I’d lose with corners.
So I headed to Pinterest and Houzz (my two go-to resources when I need quick inspiration) to search for closet inspiration, and I realized that most closets don’t use 23-inch-deep frames. Most closet system are only about 14-16 inches deep. The only reason you’d need 23-inch-deep wardrobes is if you want to put doors on them and have everything closed inside. But if you’re not using doors, there’s really no need for such deep frames.
Here’s what I’m talking about. This is an image from Home Depot’s custom closet systems page. You can see that the hanging clothes stick out past the frames of the shelves and drawers. Those frames are only about 14 inches deep.

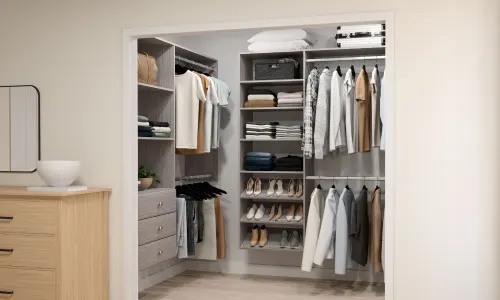
And there’s no need for them to be deeper since there are no doors on the frames, and no need for the hanging clothes to be completely contained within those frames. And having shallower shelves just makes more sense to me. I was just having so much trouble picturing storing my shoes or folded sweaters or purses on 23-inch-deep shelves. It seemed like a lot of wasted space. And the good news is that when you reduce the depth from 23 inches to 14 inches, the corners become usable. You can have corner shelves with 14-inch-deep frames without taking up a huge amount of room, so no storage space is lost.
So with all of this newfound inspiration, I started back at square one with the room. I started off trying to make IKEA’s 14-inch-deep wardrobes work, but the size limitations became a problem. Plus, the main size I would need to make this new design work (the 14″ deep x 29.5″ wide) is the one size they’ve been out of stock on for several months now, and there’s no indication when they’ll get more in. I can’t base my whole design around something that may or may not be available when I’m ready to start the room. And they didn’t really fit perfectly anyway. It was more of a “it’s the closest to what I need so I can probably make it work” type of situation.
So in the end, I just decided that the way for me to squeeze every inch of usable storage space out of this room is for me to build it myself from scratch. With that in mind, I designed, and tweaked, and moved things around, and tweaked some more, until I came up with what I think is the perfect plan. This gives me quite a bit more closet storage space than my original idea, and it separates the laundry area from the closet area. And the best thing of all is that going from 23-inch-deep frames to 14-inch-deep frames allows room for an island in the middle of the closet area for even more space, and also for a place for me to fold clothes as soon as I get them out of the dryer. So here’s the new plan…

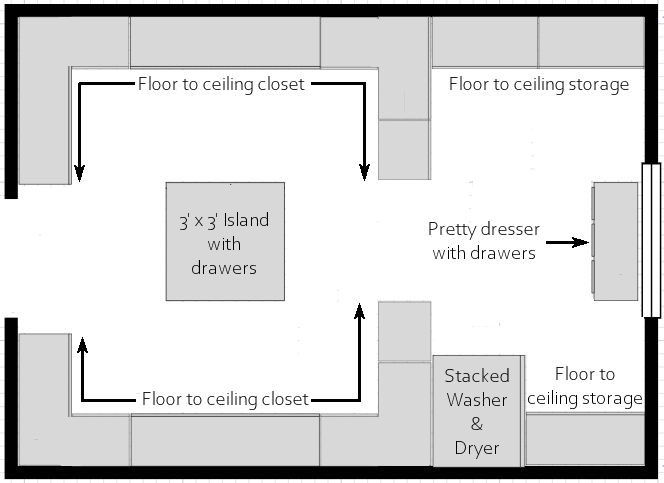
I’m so excited about this new plan. I lie awake at night and dream about it. I can’t wait to get started! The plan does require a stacked washer and dryer, but I’m okay with that. I mean, I’m only five feet tall, which means that I’m used to things in life being a little bit inconvenient for me. When I had my old washer and dryer (before I bought my current ones), I had to use a step stool to get things out of the washer. Constant slight inconveniences are just a way of life when you’re only five feet tall, so I’m used to it. So if I have to use a step stool to get things out of my dryer, it won’t be any worse than my old washer.
Side note: As I was finishing up writing this post, the driveway guys showed up!!! They weren’t scheduled to be here until Monday, but they finished up their last project early, and came right over to get started. WOOHOOOO!!!! They’re going to start at the back of the driveway (back section of driveway behind my workshop, and the ramp to the workshop) today, and then work their way to the front of the property. So by the end of the day today, I may have a ramp, but the bulk of the progress will still happen next week. But at least there’s progress, and EARLIER than scheduled! How often does THAT happen?! 😀


Addicted 2 Decorating is where I share my DIY and decorating journey as I remodel and decorate the 1948 fixer upper that my husband, Matt, and I bought in 2013. Matt has M.S. and is unable to do physical work, so I do the majority of the work on the house by myself. You can learn more about me here.